


The New Years Eve post was done with my new camera- a Kodak Z1015 IS. While I think the pictures are good enough, I'm not happy with the Kodak editing software... so now I have to figure out how to go back to the HP software I had, or the Microsoft editing software that showed up unexpectedly the other day. Umm, where'd that come from??
I wish I had a picture of me pulling my hair out, lol!!
Be careful if you are out tonight, please!
Wednesday, December 31, 2008
Happy New Year's Eve!
What better way to celebrate the New Year than to have a baby right? Thud lol, not us, silly! Traditionally the first baby of the New Year get gifts from a community~ and our hospital is no exception! We celebrate the first girl and first boy. These are the cards I made to go in the gift baskets~

The boy card is an A-2, and is the Casual Midweek Challenge #28 on the PapertreyInk forum. The sketch is by Mary K, and she published it way back in October. I saved it up to do a baby bubbles card, lol! The blue patterned paper is SU's Print Patterns Bashful Blue. The banner was cut from a Sizzix die. Of course, the bitty baby faces came from PTI's Bitty Baby Blessings set. Numbers are from PTI's monogram set; the sentiments are from Mixed Messages. The First Baby Boy words were created with PTI's Simple Alphabet. Ok, this alphabet is not simple to work with, lol, but the outcome is great! Just pay close attention when you clean them; mine have been known to disappear and then show up in the strangest place, lol! The little charm came from Wilton's wedding and baby shower section.

The bubbles are those round firm half circle thingies (they must have a proper name, but it eludes me!). The top one is cute in half, to have the baby explode out. Isn't that clever? Well, it was Michele's (Iamderby) idea, not mine! There are clear Stickles all over the banner and making smaller bubbles all over the card.

The girl card is different~ the banner holding sweet animals is a Stampin' Up! stamp. It yelled at me from the bottom drawer to come out and welcome a baby girl! The background paper is an Imported Italian or Indian one, with lots of glitter! Fran over at Frantic Stamper has papers like this one on sale this week~ actually, the sale might end today, so you'd better go check! I colored with SU markers because they have the finest tip, and the sentiments and numbers and letters are all PTI sets like the boy card. Lots of glitter on this one, too!

I typed the inside sentiment on the computer, and printed it on SU's Whisper White card stock. I hope the new mommies like them!
Monday, December 29, 2008
A Comparison
 Here's a re-do of one of yesterdays cards, just to see the color comparison.
Now I am off to go read the manual, lol, and see how much better the photos can get!
Just as a first impression: The buttons are very obvious. The LCD screen is bigger than I need, and it uses lots of battery to run, but there is a viewfinder if I want that outside. It's a perfect fit for my hands, but it is a wee bit heavy (I'm not sure it could be any lighter and still have the configuration I need to keep my hands around it).
Now off to watch the DVD, and play around!
New Camera!
 It's here, it's here! Camera choice was way too complex for me to think about, so I asked my DD to choose one within my budget, knowing what I wanted it to do, and here it is!! A Kodak EasyShare Z1015 IS.
Here's the first card! Let me know how it looks to you!!
Sunday, December 28, 2008
Twins!

I dreamed my broken camera fixed itself overnight~ not so. I turned off the autofocus, and now it will take pictures, but it's very hard to figure out if the pictured is focused or not, lol!
This is a plain & simple but effective card for twins~ it's so sweet! I colored the duck bills in SU's Summer Sun marker, and it looks like a perfect match to the PI Summer Sunrise cs. The brads are also from SU, but aren't a perfect match. OTOH, the little bit of color difference works well. The duckies are from Bitty Baby Blessings, of course, as is the sentiment. The label is a Nestability I bought from PTI.
It was painful to have a card with no ribbon or buttons, lol, but I did it!
Saturday, December 27, 2008
Spring Rain and Pure Poppy

Oh dear, I played with the colors and saturation, and I think I lost Spring Rain!
The patterned paper is from Papertrey, the new Men of Life 8 x 8 pad. The onsie is cut from the cover of the pad, lol, so the color is a wee bit different. The layers are cut from Pure Poppy with Nestabilities rectangles. 'Little One' comes from inside one of the ovals from Just Hatched, I cut out all of the sentiments from the ovals as soon as I got the set, lol! The blue ribbons are Spring Rain gingham and twill, the white is SU's 1/4 inch grosgrain; they are tied to a Close To My Heart White spiral clip.
6/40 for January, lol...
5 Baby Cards from Blog Hop Inspiration!
On last night's Blog Hop, Lori showed 3 baby cards using the 'silk' something or other technique with tissue paper. You can see her cards here. Now, I have no idea what the technique entails, but I do know I loved her cards! Today was a baby card day, so when I got up this morning I went right to her site!
When I was done making 5 cards and done dinner, I shook my ailing camera, told it where it was going if it didn't behave, and pushed all of the buttons it has. Interestingly, when I turned off the auto focus, the funny noise went away and the picture came into focus! It lasted long enough to take these photos! Yay!
The first card is almost an exact copy of Jen's, using Papertrey's AquaMist and Lemon Tart. Of course, the baby onsie on all of the cards is from Bitty Baby Blessings. Instead of the tissue she used, I used a patterned vellum, on top of the polka dots from the Print Polka dots pad. The vellum here is not from Papertrey, but they do sell a similar one. Both ribbons are the twill, it ties a bow so well!
 I kinda liked the button, so I did a similar print from Print Polka dot, using the big dots and small dots like Jen did, but kept it simpler, and used more buttons. Layers were cut with Nestabilities rectangles. That's a bit of SU's Linen twine through the button holes.

Next I thought I'd better do a girl kind, so used Sweet Blush. I'm almost out of the larger polka dots, so used only the small. I went back to Jen's cards, but did a different set of layers. The Ripe Avocado went through the CB using the Swiss Dots EF. The oval layers are Marvy Punches, just sliced down the middle. Lol, it looks cuter IRL, with all of the ribbons and a random button!

For the yellow, I stayed very simple. Actually, with them all sitting next to each other, this one is the most visually pleasing. Lemon Tart and Ripe Avocado are wonderful together!

Lastly is another Sweet Blush, this time paired with Berry Sorbet. It may be hard to see the colors in the dots, but there is a green one in there; the Spring Moss ribbon is the perfect added touch!

Only 5 cards in one day~ seems like I should be able to make more than 5... why does it take me so long??? I do have one using Spring Rain and the Men of Life papers, but it isn't even close to being done!
When I was done making 5 cards and done dinner, I shook my ailing camera, told it where it was going if it didn't behave, and pushed all of the buttons it has. Interestingly, when I turned off the auto focus, the funny noise went away and the picture came into focus! It lasted long enough to take these photos! Yay!
The first card is almost an exact copy of Jen's, using Papertrey's AquaMist and Lemon Tart. Of course, the baby onsie on all of the cards is from Bitty Baby Blessings. Instead of the tissue she used, I used a patterned vellum, on top of the polka dots from the Print Polka dots pad. The vellum here is not from Papertrey, but they do sell a similar one. Both ribbons are the twill, it ties a bow so well!
 I kinda liked the button, so I did a similar print from Print Polka dot, using the big dots and small dots like Jen did, but kept it simpler, and used more buttons. Layers were cut with Nestabilities rectangles. That's a bit of SU's Linen twine through the button holes.
Next I thought I'd better do a girl kind, so used Sweet Blush. I'm almost out of the larger polka dots, so used only the small. I went back to Jen's cards, but did a different set of layers. The Ripe Avocado went through the CB using the Swiss Dots EF. The oval layers are Marvy Punches, just sliced down the middle. Lol, it looks cuter IRL, with all of the ribbons and a random button!

For the yellow, I stayed very simple. Actually, with them all sitting next to each other, this one is the most visually pleasing. Lemon Tart and Ripe Avocado are wonderful together!

Lastly is another Sweet Blush, this time paired with Berry Sorbet. It may be hard to see the colors in the dots, but there is a green one in there; the Spring Moss ribbon is the perfect added touch!

Only 5 cards in one day~ seems like I should be able to make more than 5... why does it take me so long??? I do have one using Spring Rain and the Men of Life papers, but it isn't even close to being done!
Friday, December 26, 2008
December Blog Hop: Trash!

Blog Hop?? Already??
Actually, I've been thinking 'trash to treasures' a lot the past few days, but with no camera to photograph, I thought I was doomed. Then, word came that Santa might be bringing me a camera, so I started to think of things to make...
On Christmas Eve we do 'crackers', and as the paper pieces were being thrown away, I saw them in a new light.

See the popped crackers?? They have little toys inside, which we pretty instantly throw away, so don't ask me why we do them~ I guess we love to wear the little paper hats inside, lol...

How do they look as favors?? I punched the Marvy pink scallop circles in Pure Poppy, and cut the torn crackers into pieces. They were already a tube, and you can see how the tubes were cut to allow the middles to fold in. I hope I'm making sense. I then glued the cut parts to the punched circle, and done they were!! These crackers have pictures in one direction only, so I am only able to get two favors from one cracker- since the bottom section has no cut edges to glue. Still, I had a dozen crackers, so I could get 24 favors from them. If I wanted to dig in the trash, that is!!
Oh, and if you are thinking Santa brought me a camera with bad color images, it's not true. I am still camera-less, sigh.
Wednesday, December 17, 2008
Moonlit Night
 Not sure why the photo looks 'warped' in the middle, lol...
I created this during a PTI Blog Hop a while back, but now I forget what we were talking about to stimulate me to try this. Vellum, I think.
The background is Summer Sunrise ink on Lemon Tart cs. The clouds are blue ink-sorry, forget the color- swireled on vellum. The moon is a piece of alcohol inked paper punched out. the vellum was torn, and Tombow'd down. then, trees from SU's Lovely as a Tree were stamped in Versafine Onyx Black. Stars were added with a white Signo pen. The whole shebang was layered onto black.
Retrospectively, I wish I had edged the piece in black, then layered it on a dark blue or a different color. A couple of brads would add some depth, too.
Pioneer Woman Survives!!
Yes, we have power again! 5 days without was the longest I think I have gone in recent memory, lol, and I survived! With the DH away, I was alone for half of it. When he got home he was aptly impressed to learn I still had water to spare, the fire had only gone out on the warmest day and I did that to shovel ashes out, and that I made 'drip' coffee instead of boiled. hey, I just heated the water on the wood stove and poured it through the little mesh basket on the dripolater!
I have decided to put off buying a camera until after December 26 when the credit card rolls over, lol. If I don't post often between now and then, you'll know it is either because the Holidays are keeping me busy or gosh, I haven't any photos to share!
I have decided to put off buying a camera until after December 26 when the credit card rolls over, lol. If I don't post often between now and then, you'll know it is either because the Holidays are keeping me busy or gosh, I haven't any photos to share!
Sunday, December 14, 2008
No Power!!
It's true, things are a bit rough in my neck of the woods. We've had no power since Thursday night. The power company 'scout' came up our dirt road today and said he thought they would have us back on line on Tuesday. The lines from my DD's house to the pole are almost touching the ground, so we can't go live until they get them back tight to the pole. Since we heat with wood, staying warm is not an issue.
So! It's taken the pressure off getting a new camera, lol, but I am sorry I have no uploads for you! Keep checking back, and hopefully on Tuesday I'll have something new to share!!
So! It's taken the pressure off getting a new camera, lol, but I am sorry I have no uploads for you! Keep checking back, and hopefully on Tuesday I'll have something new to share!!
Wednesday, December 10, 2008
Snowflakes!


My SIL gave me some package wrappers her business used last year; they were punched out snowflakes, they had a score line, and slots in the middle to run ribbon through. I made a card with them, back a few pages, but had this idea in my mind.
I just folded them the intended size, and punched out a few extra snowflakes. SU's whisper White matched quite well, so I made 3 purple sized Marvy snowflakes. I stamped those giant flakes with PTI's Snowfall flake in glue, then added glitter. A SU bling brad is in the middle of each. Those are put on the center where the ribbon slots were. Inside are red tea lights in square tea light holders- just a little smaller than the paper square, which is good for flame control! The large mirror tray came from Michael's, and white snowflakes are all around. I may put fewer flakes on when I put it on her table tomorrow while she is at work!
Tuesday, December 9, 2008
Red, Brown & Aqua

One of the Casual Midweek challenges over at the PTI forum was to use Dark Chocolate, Pure Poppy, and Aqua Mist. But gee, I need boy baby cards this week and I really wanted to use Spring Rain instead! So I used Aqua Mist at the bottom for water, and Spring Rain for sky. The boat is from the new Men of Life set, but the baby face is from Bitty Baby Blessings- as is the sentiment! My failing camera has a lot of settings on the top, but none of them say IRL. I wish it has a setting that would show how it looks In Real Life, lol.
Going out tomorrow if the weeather holds to start the search for a new camera- sigh- I'm looking forward to better pictures, but not shopping and paying, lol!
Sunday, December 7, 2008
Sorry...


Two apologies: I haven't posted in a week- work has been in my face, and golly, with Christmas coming, I couldn't say no! We've had 3 people from my shift quit, one without notice... so I've been working some open shifts. My DH and I try and live very simply. Being on dial up and having no cell phone means you can't go on the computer when you volunteer to be on call.
My other apology is in case you have seen the pillow case before. I made it for a PTI Blog Hop
back in the fall, so thought you might like to see it now. I stamped the images from Believe on white muslin (not cream) with Versafine ink, heat set, then colored in with Prisma markers, being very careful to stay away from the black lines as the markers did bleed a little. I contemplated buying some fabric markers, but never did. It might have been a better idea!! I have no idea how this is going to wash, and I may end up doing it by hand. The fabric is from a few years back, it is designed by Debbie Mumm. I liked the final project, with or without stamping, and I now have fabric for a dozen more pillow cases!
back in the fall, so thought you might like to see it now. I stamped the images from Believe on white muslin (not cream) with Versafine ink, heat set, then colored in with Prisma markers, being very careful to stay away from the black lines as the markers did bleed a little. I contemplated buying some fabric markers, but never did. It might have been a better idea!! I have no idea how this is going to wash, and I may end up doing it by hand. The fabric is from a few years back, it is designed by Debbie Mumm. I liked the final project, with or without stamping, and I now have fabric for a dozen more pillow cases!
The DH is away for a week... Today my plan is to make 6 wreaths and deliver them, do the dishes, keep the fire going, clean the Living Room, decorate the Living Room, make 4 baby cards, make a dinner for 5 and take it next door to watch the Patriots football game (we don't have a TV, so I have to buy the football games with food, lol!!).
Think I"ll make it??
Monday, December 1, 2008
Papertrey Cash & Carry challenge


I thought since today the PTI Design Team is showing their 'Cash & Carry' projects, I would show mine as well! For the past few years the DD's and I have made Black Friday a fun event... we meet late on thanksgiving for sale circular perusing, sleep a little, then head out at the time the first store we want to go to opens. Last year I think it was 3 or 4 am, but this year we were at toys R Us at 5:15! Heck, 5:15 is practically a regular day! All year I plot, plan, and save so I can give them some cash so the shopping can just be fun, and to not worry about how much is being spent. Of course, they also need something to keep lists, receipts, and cash in!
I started this year's planners with coupon holders from a dollar store. The blue sky is PTI's blue metallic, stamped with SU's White craft ink with PTI's Polka Dot basics. The Santa and Tree come from PTI's Believe set, and were colored with Prisma markers. The Bank of Mom sentiment was started on the computer, then Believe was stamped on top, and then the B from Believe was inked to make the B in the word Bank. papers are from PTI's Vintage Holiday 8 x 8 pad.
Sunday, November 30, 2008
Testing the Camera's colors
 this is Kaleb's Star Wars Evil command Base. He would like to have his own Leggo's blog.
I would like a new camera.
Look Ma!


Here are two proverbial 'Look Ma! No hands!' cards. Except, insert 'No stamps' for the 'No hands'! These ornaments are from a piece of 12 x 12 scrapbook paper I bought last year. A little bit of glitter gel pen, some gold edging or layering, ribbon and a few Dew Drops. Voila! Done!
Now, I have bad news and good news. Bad news- the camera is just about defunct, and there is not much money around at this time of year. Good news- I get to buy a better camera. Well, I get to buy a better camera only if this one lasts into a new credit card cycle. When I turn the camera on, the screen is all blurry and moving- like the old tube tv's used to do on their way out. Probably no one under the age of 40 will relate to that, sigh.
If you have a great camera in the $25.00 range- ok, just kidding- let me know what camera and what you like about it.
Saturday, November 29, 2008
This One's Different!
 Sometimes you just gotta break out and do something different! This is done using the sketch from the Casual Midweek Challenge # 29- or was it 30?? on PTI's forum. I wanted to make a Christmas card, but I was too tired to dig out lots of Christmas papers- and these inked papers were just sitting there! The first layer is Hollyberry Glimmer Mist on watercolor paper, the red and green papers are alcohol inks. The edges are done with the Pilot gold marker. Those are dark pink Dew Drops up the sides. The sentiment is in the set Believe from PTI. It looks ho-hum in the pictures, but it really glows in real life!
PTI CMWC Baby
 Working on baby cards again today- phew, sometimes I get close to running out of ideas and energy! That's where Challenge sketches really help! This card uses Casual Midweek Challenge # 29 on the PTI forum.
 While I have a stamp of the baby on the moon, this one is from a 12 x 12 scrapbook paper- easy! The purple background is a piece of paper as well. The little tag is made with an image from Boxes, Bags and Tags, with a sentiment from Bitty Baby Blessings inside.The lavender layers are Plum Pudding, and the base is PTI's cream. The ribbon is their new Vintage Cream satin. You may not be able to see it, but all of the stars have glitter in them, and there are Liquid Pears drops in the corners and down the left edge. Ok, I did drop it before it dried, and those drops are a little mushed, but the babies won't know it!!
Friday, November 28, 2008
Birthday Wishes ala Pine
 Not a baby card, and not a Holiday card! What's up with that?? Actually, I am trying to clean out some of my photos, lol, and realized I never uploaded this to the blog~
I tried to make a card using Twinkling Waters, but only had bright colors. Really bright! Luckily, I had a piece of an alcohol ink run that was equally bright, lol! Ribbon is Joanns cheap organdy, I lined the edges with a gold Pilot pen. Stasmps used were Little Lady and Flower Garden, both from Papertrey.
Tuesday, November 25, 2008
An award!

I received an award! lol, I'm not sure what it means, other than maybe Claire likes my things, lol!! That says a lot, of course, since claire makes some incredible things herself! If you haven't already, make sure you visit Waltzingmouse on the sidebar!
PapertreyInk Blog Hop: Flowers

Oh my goodness, it's Blog Hop time again! I like getting ready for the Blog Hop, but man oh man, it's bad when you think the Hop was 2 weeks ago, and you have two more to prepare, but when you look at the calendar it's really in 3 days! Am I the only one living in a time warp?
I live in southern Maine, and we are being hammered by a wind/rain/snow storm. At the moment we have electricity, but many do not. If I'm not around this evening, you'll know I am sitting in front of the wood stove reading with candle light!
 I learned how to make ribbon roses in a Scrapbook class last year. These flowers are made using Pure Poppy grosgrain. cut a piece about 6-7 inches long. Sew the ends together to make a 'circle. Take biggish running stitches along one edge, then pull the thread 'rouching' the edge; tie the thread in a knot. Voila! A flower! The centers are just circles punched from Summer Sunrise, with orange glitter glue applied. Leaves were punched from Ripe Avocado, and given some veins with a stylus. The sentiment comes from Holiday Wishes, and the little holly sprig is from Borders and Corners Oval. Thanks to Donelda for reminding me it is there! I put red seed beads on the holly sprigs, and attached the tag with brads from SU's Earth Elements set. Card base is Pure Poppy, first layer is from Vintage Holiday Patterned Paper and the layer under that is Ripe Avocado.
Enjoy hopping around!
Saturday, November 22, 2008
A Red and White Challenge

I am so tired my eyeballs are ready to fall asleep independent of my brain, lol!
Casual Midweek Challenge # 32 on PTI's forum was a photo inspiration; the front of the Pier One Christmas catalog. It's a beautiful cover, and I'll try to link it tomorrow.
I used Pure Poppy (PTI) and Handsome Hunter (SU), along with SU's new Sizzix bird die. Stamps are PTI's Out on a Limb and Beautiful blooms, along with SU's Baroque Motifs.
Oh my, off to bed for me now!!
Friday, November 21, 2008
Baby Carriage Tutorial
I wa asked to describe how I made the baby carriage inside the Baby Carriage Explosion Box, you can see it here.
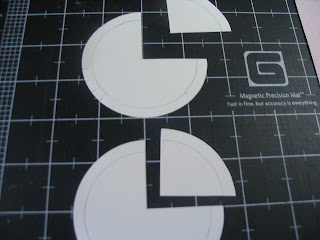 Punch out 2 of the large circles, and 1 small. The small circle is just a pattern, if it's out of a firmer paper that is good! You can trace the small circle in the large circle here,or wait until the next step. Doesn't matter! Cut 1/4 out of the large circles, this will form the shape of the carriage. I laid mine on my Making Memories mat and cut with an exacto knife.
 You will need the giga and mega Marvy circle punches, paper, 1/4 inch wide sticky tape, ribbons, flowers, and spiral clips.
 Punch out 2 of the large circles, and 1 small. The small circle is just a pattern, if it's out of a firmer paper that is good! You can trace the small circle in the large circle here,or wait until the next step. Doesn't matter! Cut 1/4 out of the large circles, this will form the shape of the carriage. I laid mine on my Making Memories mat and cut with an exacto knife.
Carriage Continued
 Lay the smaller circle on the back of the larger circles, and trace around the edge. Remove the smaller circle, and with snips, make cuts along the edge of the large circles, only as deep as the traced line. Place the smaller circle back, and use it to fold the little snipped edges up. The more time you take here (and I was being quick!), the smoother the roundness of your finished carriage.
 Place sticky strip along both long edges of the 1.5 inch piece. Pull off the red cover, and be very careful in the next step! Sticky tape is very unforgiving!
Pick up one of the circles, and lay it along the ege of the circle, the sticky part will be attachng to the folded over cut edge. Carefully lay it down, trying to stay straight along the edge.

Do the other circle, after you visualize the finished carriage to help keep the right side out, lol! when you are done, there will be some of the center section left, either trim if off as I did, or fold it over~ You can see where when I did my folded 'tabs', I didn't take time; some spots of the round circle are a little pointy- oops!
Carriage continued

Use whatever ribbon you like- I used rick rack and Papertrey's twill ribbon to decorate the hood and make a handle. The rickrack I attached with white glue, the twill with Tombow. The handle is 4.5 inches long, with tombow on about 1 inch of each end. Attach it to the inside front, facing you. Make the handle as long as you'd like.

Turn the carriage on it's side, and put white glue on the upper half of 2 spiral clips, then place them close together and near the bottom of the base for the wheels. At the same time, glue some flowers where the hood would connect. Let the glue dry, turn the carriage over, and do the same to the other side.
 Let dry. I put a fabric quilt in the original, but be creative!
 Let dry. I put a fabric quilt in the original, but be creative!
Thursday, November 20, 2008
Challenge Baby Card

One last baby card for the week (only 8 this week!), and it meets a Casual Midweek Challenge at Papertrey. I started by loking at Amy Rysavy's card, seen in the idea Gallery for the Bitty Baby Blessings stamp set at PTI. The Momma and Baby duckies are from Bitty Baby Blessings, stamped in Versafine Onyx Black and colored with watercolor crayons. The background paper is 12 x 12 Pink Patterns paper. The Sweet Blush piece was put through the Cuttlebug Dots embossing folder. I cut Spring Moss with the scallop blade of my Carl cutter, and tied PTI Lemon Tart around the bottom. The sentiment is also from BBB, and is punched out with SU's medium sized oval. Two bitty buttons finish it off.
Confessions of a Failed Challengee
So, I have been put on notice that I failed to complete the challenge as it was issued- I forgot to use the white ribbon! And, more confessions: I issued the challenge months ago, then never did it! lol, I kept putting it off, since I hated the butterflies- ha!
They are all beautiful cards, and we all had fun, so the day is good!
I'll go see if I can find the little white piece of ribbon, lol, and get it tied to my big bow pronto.
They are all beautiful cards, and we all had fun, so the day is good!
I'll go see if I can find the little white piece of ribbon, lol, and get it tied to my big bow pronto.
Wednesday, November 19, 2008
A Girlfriends Friendly Challenge
Once upon a time, three girlfriends had a friendly little challenge. The challenge was to use these honking huge crystal butterflies I bought from Michael's in a fit of passion- well, every story needs some passion, right? Here's what we came up with, and they are all super!

Cindi used SEI paper Jolie Chocolate, the same I used on the baby card earlier this week. She cleverly cut the paper to highlight the flowers, then sliced the edges and curled them up to make them 3-D. It's layered on pink, then on white card. She wrapped SU's Chocolate Chip Satin ribbon with white narrow satin ribbon, then tied the butterfly to them- stunning!

Alex used all SU things, the flowers up the edge, in brown, are rub-ons. Better hurry if you want them, they may retire out of the catalog soon. She also used the new SU border punch. Her colors are Chocolate Chip, Old Olive, and a teensy bit of Tempting Turquoise. The color choice was ingenious, the turquoise really pops, but in just the right way! Alex is a SU Demo, so email me if you want her Demo address.

I used purchased silver metallic embossed paper. Leaf ribbon (Papertrey on the side bar has it, Fran probably does, too) with bought pearl flowers growing up the center, then a little silver Love charm on the bottom corner. A huge organdy bow finishes it off!

Inside, on the left, I put a little holder for the moolah, since I was seeing this as a wedding card. A SU heart forms the inside sentiment; I will probably color this if I ever use the card. I say that since it would have to be boxed to be mailed, lol, it's about 3 inches think and weighs 2 pounds!
What fun it was to have a friendly challenge!
Subscribe to:
Posts (Atom)